

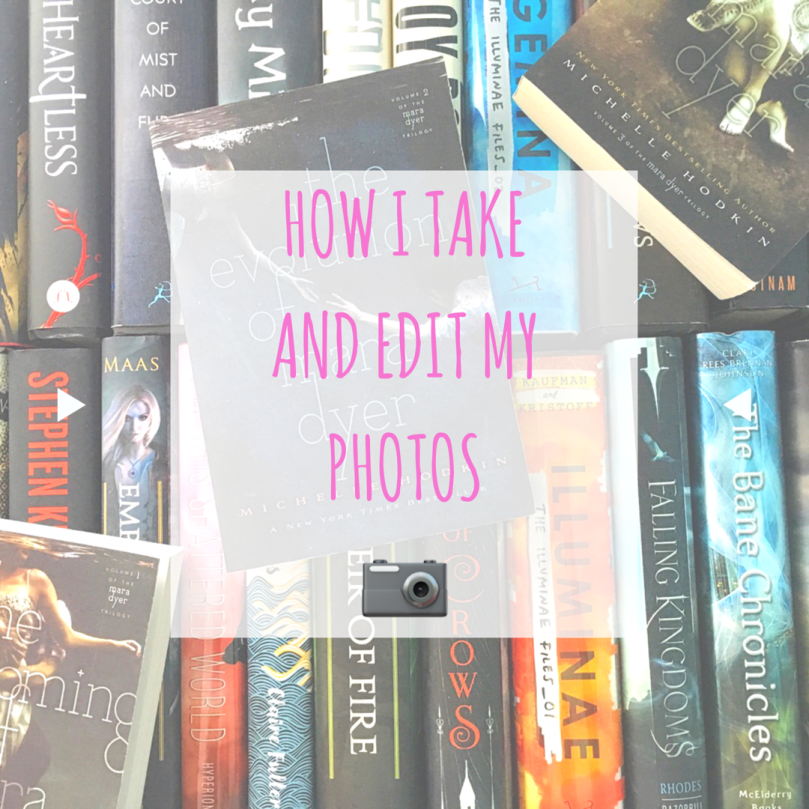
I’m always asked, “Mikaela, how do you take your beautiful bookish pictures?”
(Okay, just kidding, I’ve never been asked that.)
I asked my followers on Books Amino whether they wanted to see a tutorial of how I take and edit my photos or how I make my blog graphics. By a small margin, the photos won out, so I decided to post this one first (though how I make my graphics will be coming up sometime later this month; don’t worry)! Obviously, I’m no photography expert – I don’t own a camera and I literally have zero previous experience in photography – but I think my pictures look all right, so I’m going for it anyway!

But what if I don’t have enough books or buy a lot of books?
That’s totally fine! You might think judging by bookstagram that you’ll need an entire library and to buy ALL THE NEW BOOKS, but you really don’t. Some of my books look like trash because I’ve had them for a long, long time, and that’s totally fine! It’s really nothing to worry about.
But what if I don’t have a good camera or can’t buy one?
I don’t own a camera. If you asked me what types of cameras I could use, I wouldn’t even know the answer. I use the camera on my iPhone, and it works perfectly fine and produces great pictures (at least, I think it does)
But what if I don’t have any money for props or a fancy background?
I worried about this when I first started out because I saw all the bookstagram accounts use props, but you really don’t need them! And as for the fancy background, I literally use my hardcover books and lay them spine-up on a desk in my room. It costs zero dollars!
But what if I have no skills to take pictures?
Unfortunately, I don’t have any of my old pictures because I deleted them a while ago, but trust me, they were ugly as all hell. It took me a couple of months before I started taking pictures I was satisfied in, so you WILL improve with time. Trust me.
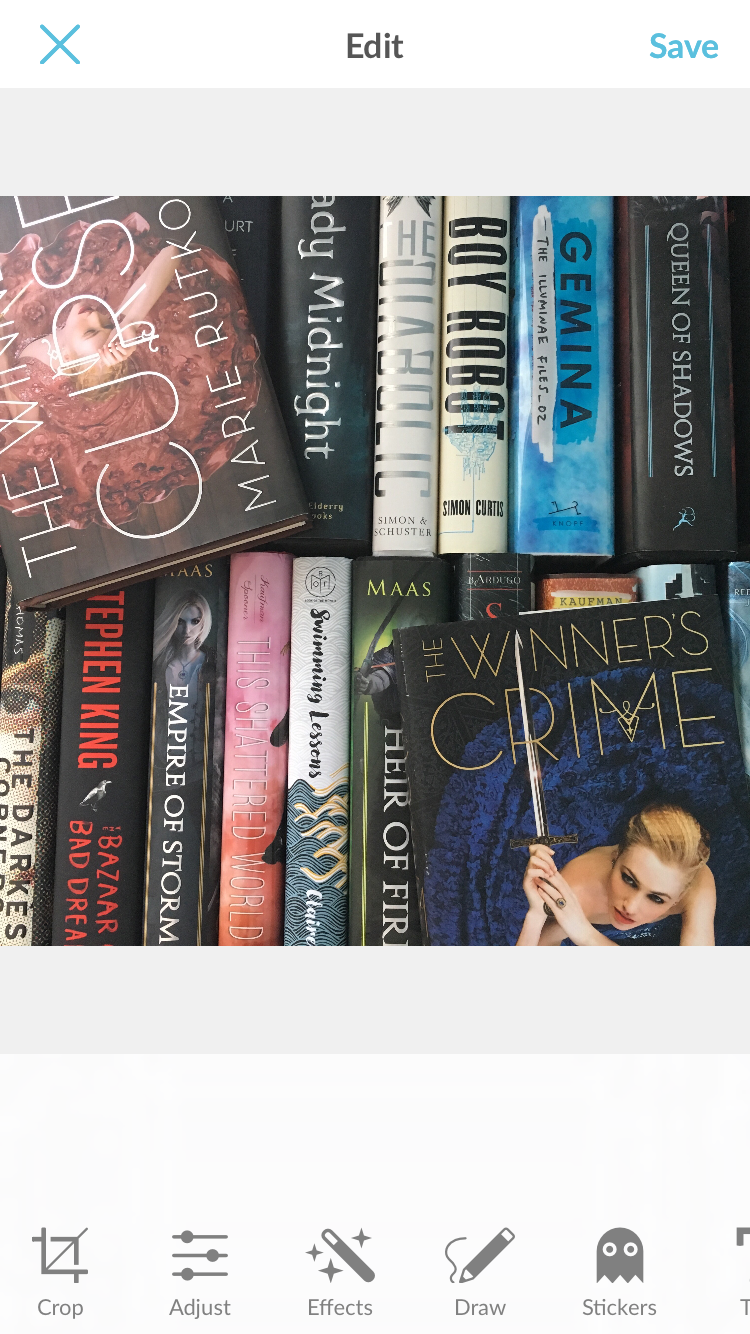
#1: Choose your background and photo-taking space.
Personally, my space is in the corner of my bedroom, on my desk, which is pushed against my window. I decided that the best course of action was to have my desk pushed up against the window because natural sunlight is always the best light! I highly recommend taking your pictures somewhere where sunlight is provided, or anywhere close to light!
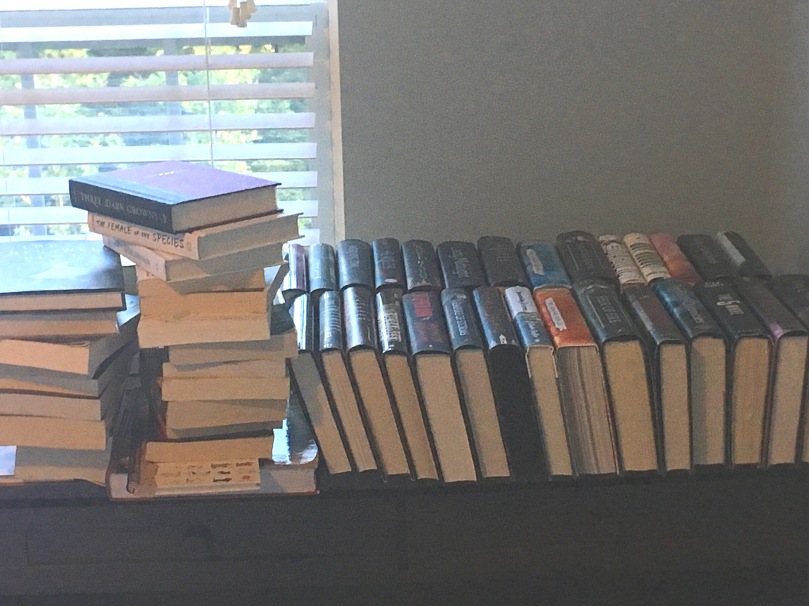
This is a picture of my set-up and shooting place! I took this photo at 7 at night, so, of course, it looks like trash, but let’s pretend this photo looks absolutely stunning.
Regarding your background, it could be anything! Some people use their bedspread, some people use the floor, some people actually buy backgrounds, some people use a table, some people use their bookshelves. There are endless choices out there! I know I personally struggled with finding a background I liked because nothing was working for me, and my room is (unfortunately) in no way aesthetically pleasing. I decided to start using books as a background, and I found myself finally satisfied! Be creative – there’s no need to spend a lot of money doing this.
#2: Set up the shot.
Obviously, it’s up to you what you include in the photo! I know there are some people out there who plan their photos and write down their ideas when it comes to them, but I’m more of the type of girl to just do a photo shoot and just come up with photo ideas on the fly while I’m taking pictures, so it’s all up to you! You can choose if you want a theme to your photo, what books you want to use, what props you’re using them, if you are, etc.
Then, you’ll decide how you use them and where they’ll go! This is when you arrange your shot, use your props the way you want to, decide if there’s going to be a theme concerning your photo, what angle you’ll take the photo at, etc. There are multiple styles out there – flatlays, stacked books, multiple books in one shot, a pile of books, naked books, book rainbows, etc. There are probably a lot more I’m missing out on.
#3: Actually taking the pictures.
Since I use my phone, this is a pretty non-complicated process. I usually take my photos in a wider shot, because I always end up cropping them once I edit (and I like having empty space and such). Personally, I usually only take one or two photos and then move on, but I know there are people out there who take several photos and then choose from all of them which ones they like best and trash the others, so it’s all up to you!
Feel free to change things up in the photo-taking process – take the picture from a different angle, put in a prop that you think will fit in, change the book’s position, etc. I also always look closely at all the photos I’ve taken just in case something looks off-center or doesn’t look right. Usually, I’ll take a picture, look at it to see if it’s easy on the eyes, and if it is, I move on. Definitely not everyone’s photo-taking process, but it’s mine!
And, also, don’t feel like all the pictures you take have to be THE PERFECT SHOT. I struggle with this all the time honestly – I’ll look at a picture and get frustrated with it because it’s not to my liking – and I really hope I can fix this terrible habit. Trust me, editing is a wonderful, magical process, and can make even the ugliest of pictures look like masterpieces.
I’m sure there are many a photo-editing apps out there in the world, but, personally, I use PicMonkey. It’s a free app, and it makes my pictures look less ugly, so it’s a win-win. If you don’t have a phone, you can also use the website on the computer. Since I take my pictures on my phone, I also edit on my phone, so I’m going to show you how I use the PicMonkey app.
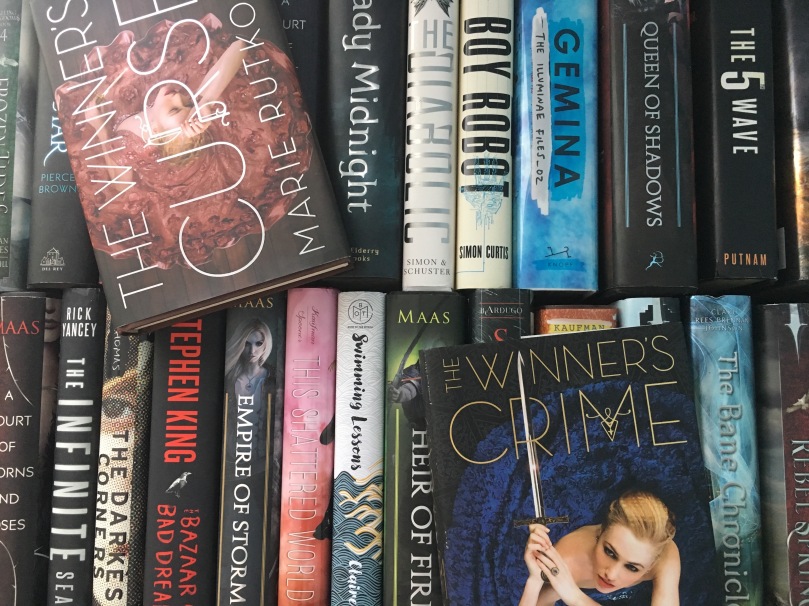
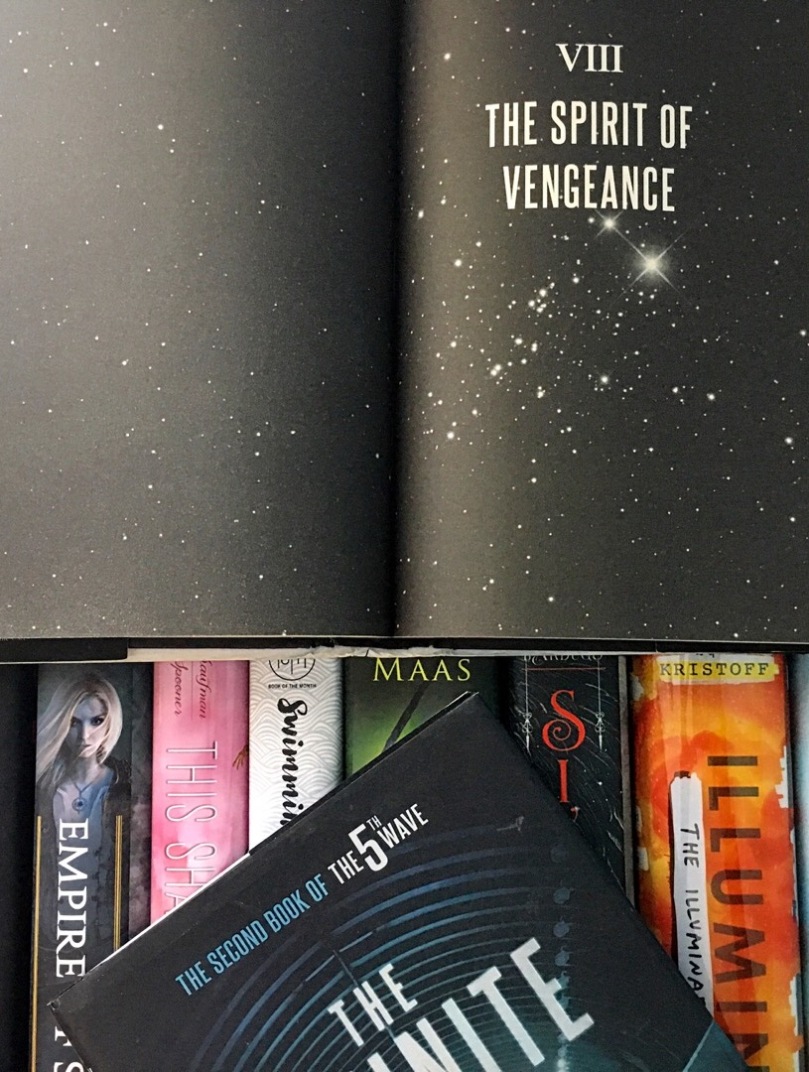
Here’s the “Before” picture! I took this one last month for one of my posts in May.
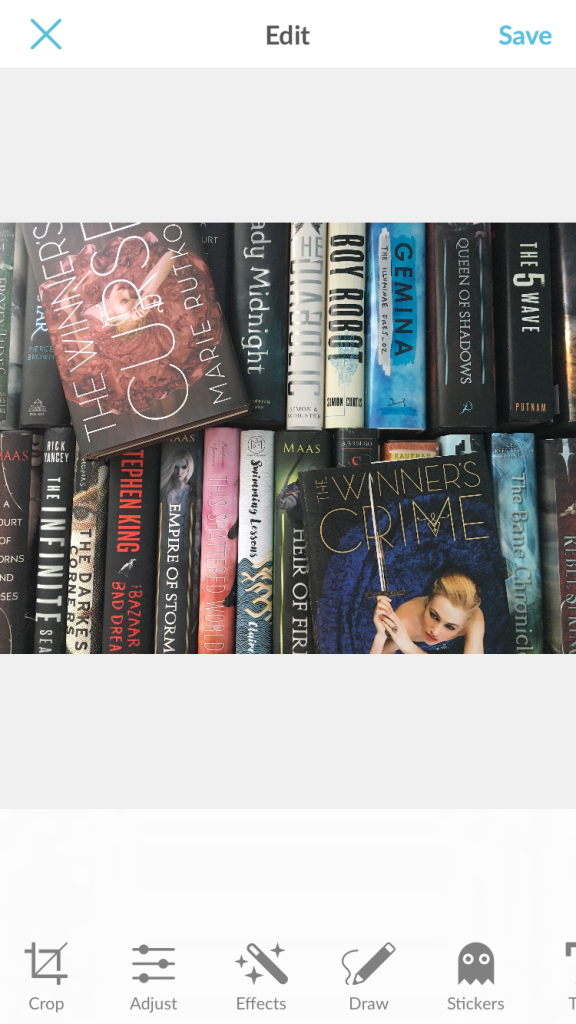
Once you download and open the app, just click the picture you want to edit, and it’ll take you to this screen. On the left hand corner of the picture, you’ll see the “Crop” button, so click that.
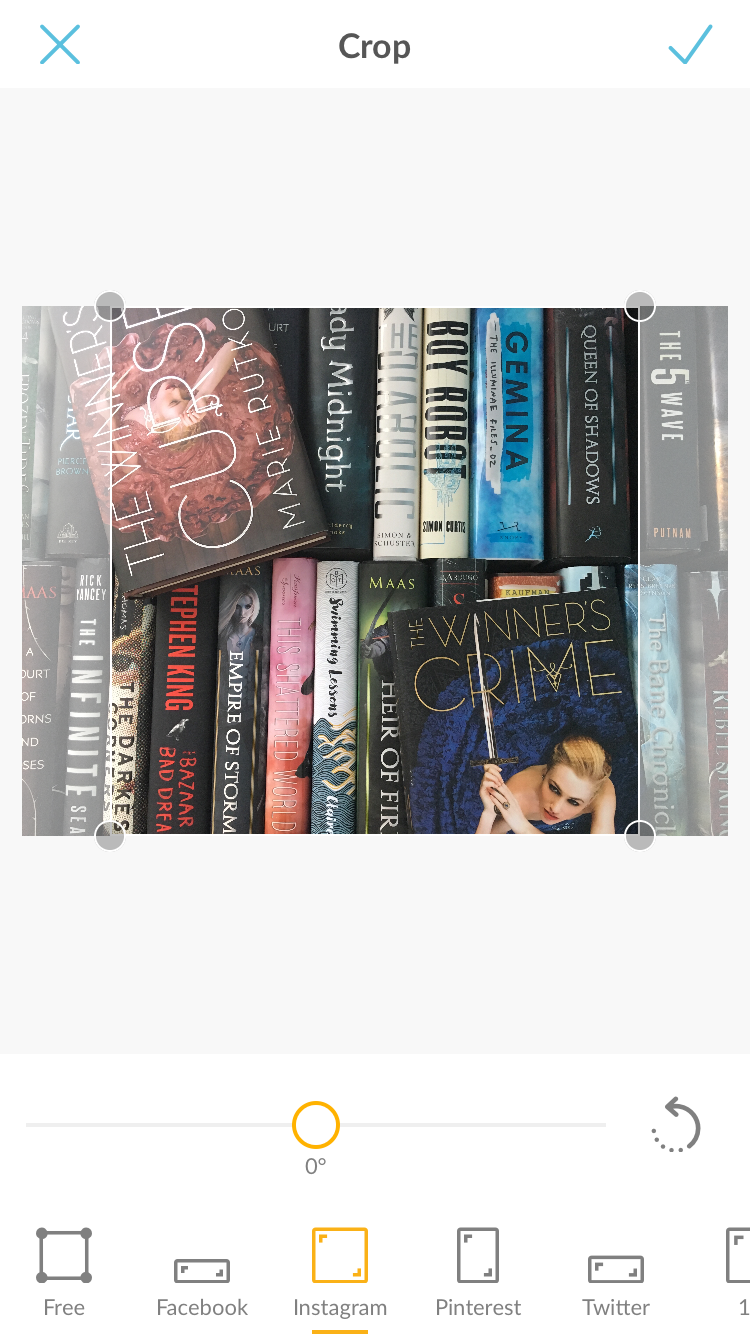
Usually, I’ll choose “Instagram” for my cropping needs. Obviously, you can crop your photos for different social media sites, such as Facebook, Pinterest, and Twitter, but since I just use my pictures for my blog and for graphics, “Instagram” is the best for me.
After clicking the check mark in the top right hand corner, you’re brought back to where you started. Usually, this is when I really start editing. Personally, the only thing I play around with regarding editing my photos is “Adjust” (I’ll go more into detail about what I specifically use next), but you also have Effects, where you can choose from a variety of themes; Draw, which is pretty self-explanatory; Stickers, which is also self-explanatory; and Text, which allows you to type things and arrange them on the photo.
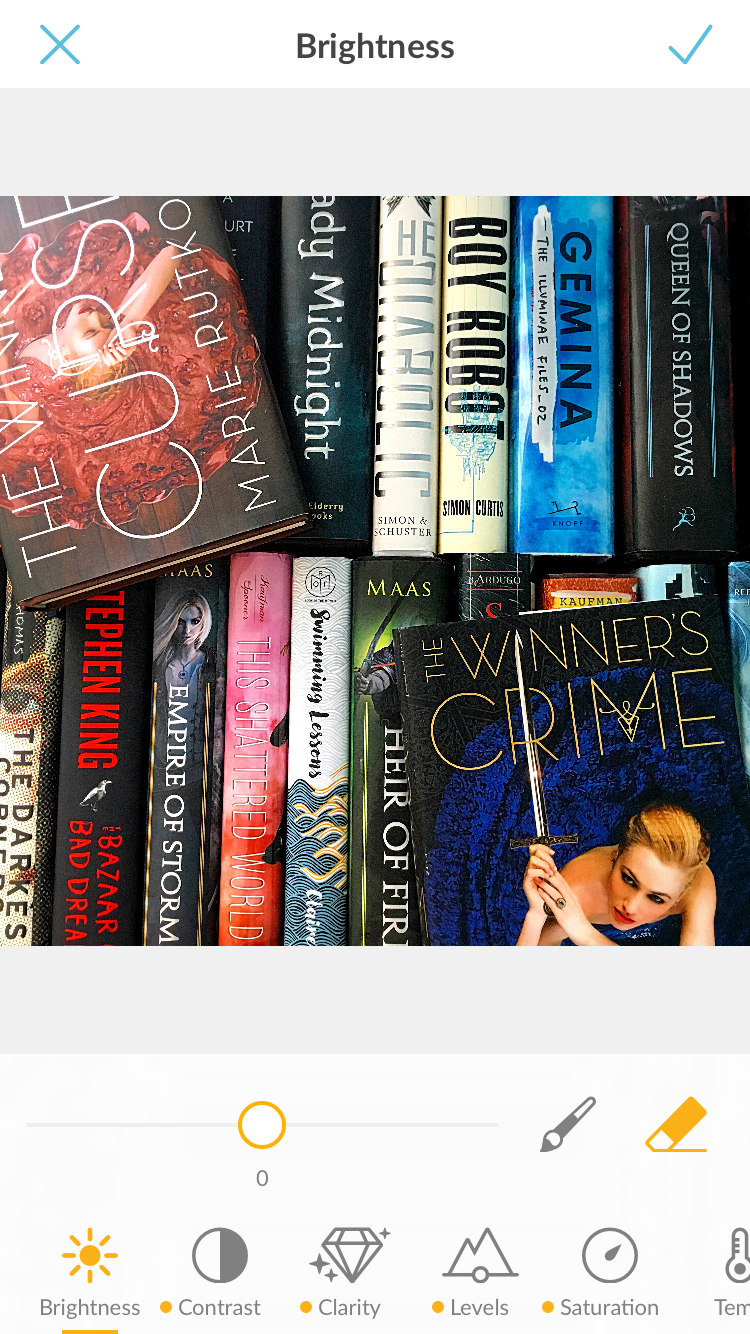
After clicking “Adjust,” I usually edit using four buttons: Contrast, Clarity, Levels, and Saturation. All of these things come together to make my photos look less dull and ten times brighter. I have specific settings for each of these things (you have the ability to scroll left or right on how much of each you want), but you can play around to see what works for you. There are three buttons I don’t use: Brightness, because I take my photos near natural sunlight (though this might be helpful for those who don’t have that); Temp, which just makes your pictures “warmer” – brighter – or “colder” – duller; and Blur, if you want to focus on a specific part of the picture and blur everything else out.
Once I click the top right corner check mark, I click “Save” in the top right corner, click the first option, “Save to Camera Roll,” and that’s it! Here’s the final product of that picture I showed earlier:

And that’s basically how I take and edit my pictures!
Hopefully, that was helpful to some of you who wanted to know all the behind-the-scenes about how I do things! I’m hoping to do two more tutorials this month (which will be how I make my graphics and how to write the perfect discussion post), but if you guys have any specific tutorials you want me to do, feel free to leave me a suggestion!


This is all great advice! Thank you!
LikeLiked by 1 person
No problem; I’m glad it could help! 😄
LikeLike
Such a great advice! I’m always interedted to see how everyone else uses to edit their pictures and it’s really helping when someone explains it (especially when they use a filter you’re obsessed with and you don’t know which😂)
LikeLiked by 1 person
Thank you! And, yes, I get that! I’m that one person who wants to see my favorite photographers’ photos unedited to see if they come out perfect or if editing is what makes them look good! 😂 Also, I LOVE YOUR PHOTOS! I remember that’s why I followed you on Books Amino; because your photos are A+. 😍
LikeLiked by 1 person
Hahaha same! Some people hardly do anything to their photos and they are so beautiful😍
Ah thank you!💕 I’ve been through a big slump but I want to start taking pictures again!
LikeLiked by 1 person
Ooh, this is awesome! The bookish photos I take are super bare — basically just the books… on a table. And sometimes it’s just one book. XD The filters on my mom’s phone makes it look good. XD I love PicMonkey! It’s awesome, and it’s a great way to make graphics too. They probably don’t have it in the app, but there’s also a Rotation tool in Adjust, to help straighten the pic if it’s crooked (which I need!). Love this behind-the-scenes guide, Mikaela!
LikeLiked by 1 person
Haha, I’ll take one book pictures if I want to! I do that a lot for naked hardcovers that are really pretty! ❤ Ooh, really? I make graphics using Canva, so that’s interesting to know! Oh, God, when I take my pictures, they’re usually straight or positioned perfectly, because if they’re not, the perfectionist inside me will go crazy. 😂 Thank you! ❤
LikeLiked by 1 person
Yesss thank you so much for making this post!! It’s pretty helpful, especually because I’m planning to take pictures for my blog posts when I create my new blog tomorrow! ( That’s right, I’m moving blogs 😦 But I’ll definatly remember to come back and follow your blog with my new account! )
LikeLiked by 1 person
No problem; I’m glad this could come at the right time! And, ah, are you becoming self-hosted or is it something else? 😄
LikeLiked by 1 person
Nope not self hosted! Just making a new blog😄 My blog got to the point where I feel like it wasnt me…I just really need the change!
LikeLiked by 1 person
I SUCK AT PHOTOGRAPHY but hey, I still try. I’m not bothering with bookstagram, because my pictures can damage health (this is how bad they are) BUT I LOVE LOOKING at people’s bookstagrams…I mean SOME ARE JUST BEAUTIFUL and what else do I do with my time. These tips were super helpful *bookmarks on Save For Later’ folder! Picmonkey is deffo a life saver.
LikeLiked by 1 person
Ugh, I quit bookstagram a while ago because it was stressful, but I definitely miss looking at people’s photos! I love the aesthetics! 😍 Yeah, I’m so glad they were helpful! And I absolutely love PicMonkey; it’s the easiest photo-editing app to use! 😄
LikeLiked by 1 person
This is great! 🙂 I love your book selection too. Thanks for the helpful post. Shelfies are the best! – Shelly
LikeLiked by 1 person
Thank you! I’m so glad this was helpful! Haha, I want to take a shelfie, but my bookshelves are destroyed at the moment, so yeah. 😂
LikeLike
I suck at bookstagram lol! I’m so glad you made this post though. Other people’s photos always look so intricate and amazing, but I love how you broke the process down. It’s really validating to hear that it’s ok to not use props and stuff. I don’t have a lot of books (or space) and I have ZERO bookish prop things – I don’t even know where to get them? I can barely even match my clothes, much less my books! You really made the book photo process look more accessible so I’m excited to test out some of your advice. Thanks for sharing this! ❤
LikeLiked by 1 person
I tried bookstagram for a while, and it was just not for me! Too stressful and it wasn’t just great for blog promo, so I quit a couple months back. 😂 I DON’T EITHER. People are like, “Just use things around your house!” but then I’ll see people use swords in their photos, and I’m like, “??? Am I supposed to have that in my photo?” 😂 Yeah, I’m glad this could be helpful to you! ❤
LikeLiked by 1 person
OMG RIGHT? Where are people finding these objects?! I’ve also just accepted that I’m much more verbally creative than I am visually, and that’s okay because it’s who I am. 🙂
LikeLiked by 1 person
This was so cool! I suck at Bookstagram so this was helpful! ❤
LikeLiked by 1 person
No problem! I hope this helps! ❤
LikeLiked by 1 person
I honestly had no idea that Picmonkey had an app. Game changer!
Another tip for background: poster board. I like to have white, minimalistic backgrounds, so I just bought some sheets of white poster board for like $1, then tape them so part is on the wall and part is on the floor to eliminate shadows. You could probably do this with fabric, too.
LikeLiked by 1 person
I actually didn’t even know it had a website until a couple of months ago??? Same with Canva. 😂 And when I tried it out, it wasn’t the same, so there’s that!
I tried to use poster board at first, and I felt like my photos looked terrible! That’s probably because I sucked at taking photos back then! I actually found some white poster board, and I’m hoping to use it once I stop being lazy. 😂
LikeLike
Your photos are always so beautiful, so thank you for sharing your secrets with all of us! 😉 I’m definitely going to use your tips. ❤
LikeLiked by 1 person
Aw, thank you so much, Zoe; I’m glad you think that! ❤ I hope this helps you in the future! 😄
LikeLike
I have always found finding the ‘right’ background hard because my room is a tatami style room and the books would not look nice and the fact that most of my furniture and stuff are in blue didn’t help lol
But your idea of using books as the background is genius. I’m going to use it xD
LikeLiked by 1 person
Yeah, same! Some people have such photograph-worthy rooms, and I just don’t. My room is a hot mess, so it was hard to find a good enough background.
And, yeah, feel free! 😄
LikeLike
Very insightful and a good reminder that you don’t have to be a professional to take nice photos. I recently started my own bookstagram account and it can be a little intimidating with all the beautiful, aesthetic photos out there. 🙂
LikeLiked by 1 person
Oh, yeah, you definitely don’t have to! I didn’t even look up how to take good pictures, I just kept doing it until I was satisfied with what I was getting. XD And, yeah, I used to be on bookstagram, and when I started out, I was so intimidated because people on there are so much more creative and have way more books than me and so many followers! But I went along and did my own thing, and, eventually, people followed me and enjoyed my stuff (even though I quit a while back)! XD
LikeLiked by 1 person
I’m going to have to try out PicMonkey. I take photos on my phone and they sell ways come out yellow. I’ve Been editing my photos with the edit options available on my phone and on the Instagram app but they still don’t always turn out so good. I’m still working on trying to figure out my background and what props I want to use.
LikeLiked by 1 person
Yeah, Pic Monkey is really good at making my full photos look prettier than they are! 😂 I definitely use the editing option son my phone sometimes when I need to straighten out a photo! Yeah, it took me months to finally get a good enough background, but it was worth the wait!
LikeLiked by 1 person
I love this post! I’m always trying to find new ways to grow my instagram skills. I’m still so new to bookstagram that sometimes I feel at a loss for even where to start!
LikeLiked by 1 person
Haha, same! When I started bookstagram, I was just like, “What is this? How do I do things? How did they do that???” 😂 It took me months to get to a point where I was happy with the photos I took (but there are still MUCH better photographers than me out there like DAMN). 😄 I looked through all the tutorials furiously.
LikeLiked by 1 person
I discovered Canva the other day so I definitely have to look into picmonkey you inspired me! Thanks for the read 🙂
LikeLiked by 1 person
Ah, yeah, I hope PicMonkey is helpful! And I problem! ❤
LikeLiked by 1 person
Good post! I struggled so much with taking pictures of books for my blog for ages. They were always too dark and the background looked weird. Then I realised I can just hold up the books against my wall, which is white and simple. The photos aren’t exciting, but they’re bright and clean now!
LikeLiked by 1 person
Thank you! And I felt the same way; it took me months to start getting good photos I enjoyed! It just really does taking getting pretty creative! 😄
LikeLiked by 1 person
[…] I just mentioned above that I take my own photos, and I highly suggest doing that! It’s a fun hobby, in my opinion, and I just love taking and looking at gorgeous pictures of books! For those out there who are already panicking because they don’t think they’re good enough at taking pictures, here’s a link to a tutorial I wrote a couple months back! […]
LikeLiked by 1 person